Showing posts with label immigrant art. Show all posts

Hope: Past, Present, and Future


The theme that emerged out of my most recent round of translating the journal (bottom) layer of the immigrant (detention center) art is hope. How did these women maintain hope through the horrors they experienced? What gives them hope (& keeps them going) during the uncertainty of incarceration and pleaing for asylum? What gives them hope for a better Tommorrow? The guides art meditation leads them through these reflective questions. The general art directions also will be included, but of course (and wonderfully so) each one will look very different. 

One aspect of the directions invites participants to choose a symbol which they then repeat throughout the art. 

Best Practices for Cross-Cultural Art Sessions


It isn't always interesting to do the behind the scenes prep for an art ministry, but it is exactly that extra time spent which makes the art ministry day flow smoothly.  For cross-cultural (bilingual) art ministry best practices includes a four-step sample, which means the tedious bottom later must be done X all four samples. Key word: must. Any time I skip this laborious step...I always regret it when it's the art event day. So, paste on the happy face and do the behind-the-scenes prep so the flow goes smoothly during the art activity. 
Boring to prep but important to have: four "bottom layers" of the four-step sample. It makes it faster and easier to print the first step (in Spanish) and use carbon paper to trace the directions X 4. 

From Fear to Freedom (Immigrant Art Reflection)

Cristo nos libertó para que vivamos en libertad. Por lo tanto, manténganse firmes y no se sometan nuevamente al yugo de esclavitud.                                 (Gálatas 5:1)

The introduction to the art reflection process included the following explanation to provide background and understanding for the writing aspect:
Asylum seekers often need to prove what is called credible (reasonable) fear of persecution or torture. You are your own witness, which means you are the one who must tell the details of your story as the proof that you have “credible fear” of persecution or torture. This art exercise is to help organize your thoughts and to practice telling your story. It is very important that you share all of details which prove you have a credible fear for your life of persecution or torture. Judges look for discrepancies (differences) between the different times you are asked to tell your story. It is very important that your story is (a) true; (b) told in great detail from beginning to end; (c) remains the exact same story each time you are asked to tell it with all the facts, dates, people, and details exactly the same. This art reflection is to help you organize your thoughts to tell your full story.


First: Write your story about why you have credible fear of persecution or torture. Write down all the important details to support your story including WHO, WHAT, WHEN, WHERE, WHY, and HOW. Pay careful attention to detail. Write exactly what happened.
Second: Go back and underline important words which remind you about the details of your experience. For example, you might underline a date or the name of a person or a particular location. Write these key words or phrases on the small piece of paper and set it aside. You will use this list later.
Third: Use tempura paint to make a pretty mono print on top of your words. (If you do not want to cover up your words, you can make the art on the other side of the paper or you can get a new piece of paper.) Go to the table with the paint, rollers, and “Gelli Art” mono printing plates and Pastor Helen or Pastor Sabrina will show you how to make a mono print. Dry the print before you go to step four.

Fourth: Take the list of words you underlined and write them on cut shapes which symbolize your freedom from fear. Glue the shapes with the words on top of the mono print painted page. You might want to put them in the best order to help you remember exactly how to (re)tell your story. The goal is to create a visual that helps you remember all of the details of your story. Use the many art supplies to decorate your art story. 

My Love Story (Immigrant Art Reflection)

Nosotros amamos a Dios porque él nos amó primero.

1 Juan 4:19
During a recent art session with immigrant women seeking asylum, they created a mixed media art piece of their love story. The guided meditation included four steps to guide the reflection and the art process.
First: Use a pen or pencil and write your love story. How do you feel or experience the love of God in your life? Who are the people in your life who have shown you love? Grandparents? Parents? Brothers and sisters? Children? Grandchildren? Aunts and uncles? Priest or minister? Teacher? Friend? What have you learned about love from these special people. How has their love given you encouragement, blessing, joy, or hope?

 Second: Choose 1-2 favorite colors of acrylic paint and 2-3 different stencils—symbols (shapes) of your love story. Use a blue plastic square to scrape paint over the background (cover the words) and then quickly place a stencil on top of the paint before it dries and use a baby wipe to rub off the paint in the stencil/hole ( “reverse stencil art technique”). Repeat with a second color of paint and a different stencil. Clean stencils with baby wipes.
Third: Use an oil pastel (like a crayon) to fill the page with hearts, start with a small heart and then make bigger and bigger hearts until the page is full and you have covered the stencils. Use a pen or pencil and write inside and around the heart shapes. You could write a prayer or a love letter to a special person in your life.
Four: Add stamped images, cut shapes, and pretty tape. Outline shapes with puffy paint. Write your name and date.

My Love Story Bi-Lingual Art Reflection (Directions)


Mi historia de amor – My Love Story

Primero: Utilice un bolígrafo o un lápiz y escribir su historia de amor. ¿Cómo se siente o experimenta el amor de Dios en tu vida? ¿Quiénes son las personas en su vida que han demostrado que amas? ¿Abuelos? Los padres? ¿Hermanos y hermanas? ¿Niños? Nietos? ¿Tías y tíos? Sacerdote o ministro? ¿Maestro? ¿Amigo? ¿Qué ha aprendido sobre el amor de estas personas especiales. ¿Cómo ha su amor dado aliento, bendición, alegría o esperanza?
First: Use a pen or pencil and write your love story. How do you feel or experience the love of God in your life? Who are the people in your life who have shown you love? Grandparents? Parents? Brothers and sisters? Children? Grandchildren? Aunts and uncles? Priest or minister? Teacher? Friend? What have you learned about love from these special people. How has their love given you encouragement, blessing, joy, or hope?

Segundo : Elija 1-2 colores favoritos de pintura acrílica y 2-3 plantillas símbolos diferentes (formas ) de su historia de amor. Utilice un cuadrado de plástico azul para raspar la pintura sobre el fondo (cubrir las palabras ) y luego colocar rápidamente una plantilla en la parte superior de la pintura antes de que se seque y use una toallita de bebé a borrarse la pintura en la galería de símbolos / agujero ( " arte de la plantilla inversa técnica"). Repetir con un segundo color de la pintura y una plantilla diferente. Plantillas limpias con toallitas de bebé.

Second: Choose 1-2 favorite colors of acrylic paint and 2-3 different stencils—symbols (shapes) of your love story. Use a blue plastic square to scrape paint over the background (cover the words) and then quickly place a stencil on top of the paint before it dries and use a baby wipe to rub off the paint in the stencil/hole ( “reverse stencil art technique”). Repeat with a second color of paint and a different stencil. Clean stencils with baby wipes.

Tercero: Use un pastel de aceite (como un lápiz) para llenar la página con el corazón, comenzar con un pequeño corazón y luego hacer corazones cada vez más grandes hasta que la página está llena y ha cubierto las plantillas. Utilice un bolígrafo o un lápiz y escribir en el interior y alrededor de las formas de corazón. Se puede escribir una oración o una carta de amor a una persona especial en su vida.

Third: Use an oil pastel (like a crayon) to fill the page with hearts, start with a small heart and then make bigger and bigger hearts until the page is full and you have covered the stencils. Use a pen or pencil and write inside and around the heart shapes. You could write a prayer or a love letter to a special person in your life.

Cuatro: Añadir imágenes estampadas, cortar formas, y la cinta bonita. Esquema formas con pintura hinchada.Escriba su nombre y la fecha.
Four: Add stamped images, cut shapes, and pretty tape. Outline shapes with puffy paint. Write your name and date.

Nosotros amamos a Dios porque él nos amó primero.

1 Juan 4:19

Layered Reflection of Courage


Guided art reflections are excellent for helping to process one's life experiences. As I work with women who have little to no experience in mixed media art/reflection (not a "normal thing" to have experience with!!), it has been challenging to break the process into small "layering" steps. It is very counter-intuitive to "cover up" an art something (or even a written word) that is on a lower/first layer. It is only when I break the steps down, ideally with pictures, that it becomes more manageable and understandable.
The example here shows multiple layers of art which began with a written first layer reflecting how the immigrant seeking asylum in the US had embodied courage during her pre/journey. You can see a little bit of the words still visible in the upper left corner in the pink area. As she gradually built the layers with symbols of hope for her future, the story of her past becomes absorbed through art into the hope she is expressing for her new future. She gave her piece a title for the "top layer" of Dios es Amor (God is Love) and also wrote her hopes and prayer for the future on the bottom left.
The art reflection was inspired by the Biblical text, Isaiah 43:1-5 which talks about God calling people from the north and south and east and west and gathering them together to worship God who is the creator of all people. This text then is included in the art piece (I provided the printed words on the peach paper which are evident here on the top left of the art). First-timers at layered art always find it strange to "cover up" the words they have just written with a big piece of anything, such as this scripture. However, as they move to the second and third and even fourth layer during the art process they begin to experience the value of the guided art reflection. Novices always seen quite surprised at how much they like their completed piece!


Courage: Past, Present, and Future


How have you had to be courageous in your life? Courage was the theme for the recent guided art meditation for women inside an immigrant family detention center. I asked the women to rapidly write when/how they had been courageous before they made the decision to leave their home country, during the process of leaving, and while on the journey to the USA. The written portion closed with a prayer for courage in the journey ahead.
Some of the women write much detail, spending 30 minutes or more writing their experiences and thoughts. Others write only a few sentences. It seems counter-intuitive to the women, but immediately following the written portion they begin adding layers of art. Quite often, the words are entirely covered and it is difficult to impossible to read any portion of what they had written. The idea with the written portion is to "dump" their feelings and experiences, to name their joys and struggles and then to move into the art portion with the vision toward God's presence in their lives (past, present, and future).
      During the art process, I talk with the women about the importance of symbols. There are a myriad of stencils and stamps available, they choose symbols and shapes which hold meaning for their lives and/or which bring them hope.
Flowers symbolize growth and new life.
The butterfly (mariposa) is one of the most-selected symbols by the women.


Reflections on Courage


Mixed media art reflection based upon Isaiah 43: 5-7.
First: Write your story of courage. Think back to when you first began to think about making the journey to the USA. Make a list of your acts of courage before you left, as you began the trip, and during the journey. Next, write a prayer for today, tomorrow and the coming weeks, months, and years.

Second: Go to the art supply table and choose a favorite color of acrylic paint and a stencil shape. Put a little bit of acrylic paint on one edge of your paper. Take a stencil and return to your table. Use a small piece of cardboard and scrape the paint across the page. Quickly place the stencil on top of the scraped paint and rub off the paint through the stencil using a baby wipe. Repeat with a second color and a different stencil.  Clean the stencils with a baby wipe.  Glue the Bible verse into your art.

Third: Use a crayon or oil pastel and draw a large, simple shape over the background (tree, flower, stem with leaves, butterfly, cross). Paint inside the shapes. Add cut shapes and/or stamped images of symbols that help you to have courage. Outline the shape with puffy paint. Use a crayon or dark colored pen to write words of hope and courage for yourself and for your children. How is God present? How does God give you hope? How does God give you courage during your journey? Write your name and today’s date.

Crowns of Joy!


I've used this simple art project is every possible context: when I'm working with children and I have the opportunity to do it...I do it! Here I tied in the theme of King (Baby) Jesus and a "Christmas VBS" for immigrant mothers and children. I had volunteers prep cutting out the crowns from sheets of white poster board so they were cut and ready for the 300+ participants. It saves time and paper to cut "two for one" by centering the crown to trace in the middle of a 7-8" wide strip of poster board. If you make one continuous cut down the length of the board as you cut out the crown, then each side of the cut can be used to make crown, one side is the "shadow" shape of the original, but it works just as well as the original shape. (And yes, the crown is from Burger King!)

It is an easy project to do without a lot of production (or than having the crowns pre-cut), and the work can be done at a table or on the floor. The materials list is simple: crayons, watercolors, brushes. We used every possible table and then the overflow sat on the floor or on the bleachers. I only regret that I cannot show you any pictures of their sweet faces. They truly loved wearing their completed creations!


Home Sweet Home Popsicle Sticks Puzzle

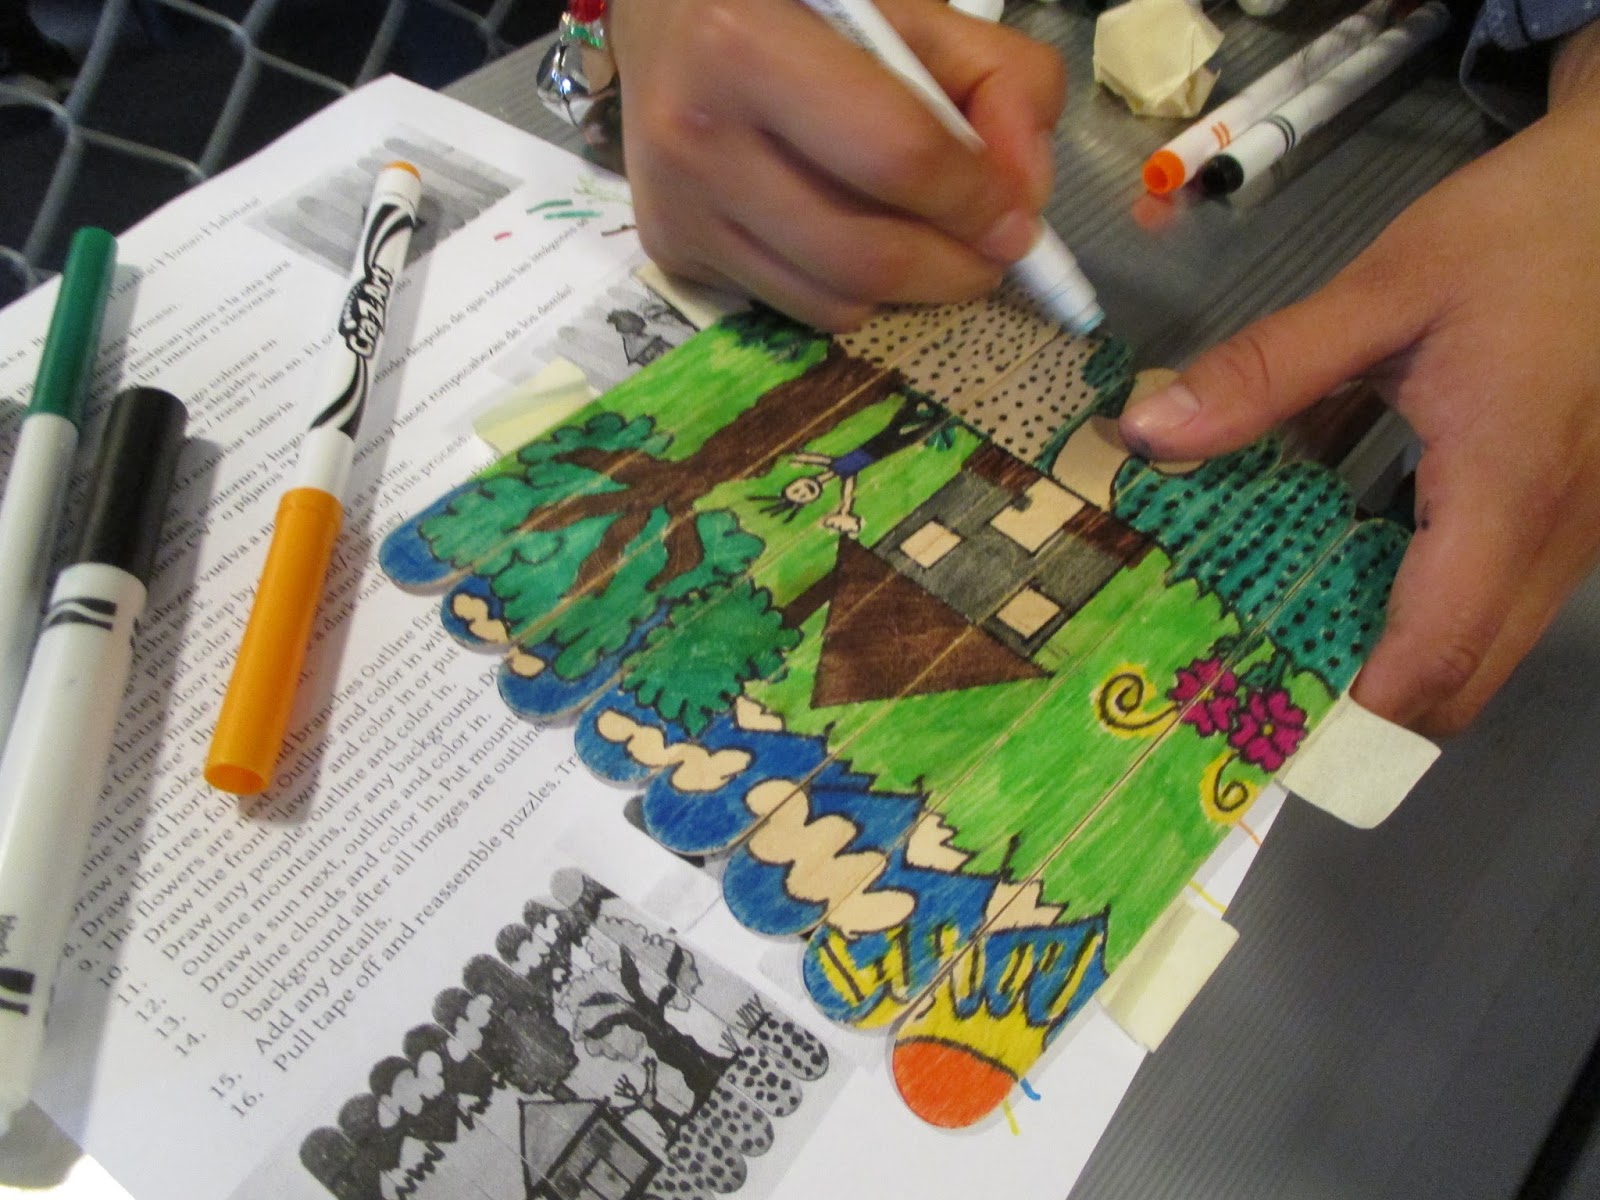
A teenager copied the sample photos exactly!
Home Sweet Home Popsicle Sticks Puzzle was a fun project during "Christmas break" for mothers and children inside an immigrant family detention center. I am grateful to my artist friend, Lynn, for sharing this project which had done with elementary school children as part of an after-school program. I consolidated her instructions (and made them bilingual) for use inside the detention center. It was sweet to see the mothers helping the smaller children and equally sweet to see the teenagers really getting into the project and adding much detail.


1.           Write your names on the back.
2.           Draw your “house” picture step by step, ONE step at a time.
3.           OUTLINE each step and color it in. Outlining is part of this process.
4.           Outline the house, door, windows and roof/chimney.
5.  Color in the forms made. Use colors that stand out next to each other
so you can “see” the outline –use a dark outline with light interior or vice versa.
6.  Outline the smoke and color it in.
7.  Draw a yard horizon line
8.  Draw the tree, foliage and branches Outline first then color in
9.  The flowers are next. Outline and color in with chosen colors.
10.        Draw the front “lawn” and color in or put flowers/rocks/pathways in. Color and outline
11.        Draw any people, outline and color in.
12.        Outline mountains, or any background. DO NOT color in yet.
13.        Draw a sun next, outline and color in.
14.        Outline clouds and color in. Put mountains in, outline and then color the
 background after all images are outlined first. Add birds (“V” birds!)
15.       Add any details.
16.       Pull tape off and reassemble puzzles. Trade and do each other’s puzzles!


Red and Green as (Universal) Colors of Christmas

I had no idea how universal the "Christmas colors" are (RED and GREEN) until I did an art project inside a detention center with immigrant women from Central America. I wanted to find out what their Christmas traditions are so that when I returned a few weeks later to do art with the children I would have prepared somewhat appropriately regarding colors and symbols for my Christmas art supplies. I was super surprised to learn that RED and GREEN seem to be universal Christmas colors-at least for Central and North America.
The instructions included (in Spanish) the following:
1.     Use a pen or colored pencil and describe your favorite Christmas from your childhood or country. What colors remind you of Christmas? What are the favorite foods that are served? Who comes to visit (or who do you go to visit)? What is your favorite Christmas song? What special activities do you do during December? What does your family do in preparation for Christmas Eve? Christmas Day? What do you do as a family? What are the smells that remind you of Christmas? What is the one tradition that is the most important to you about Christmas? What is the one food that you think of as a must have for Christmas?
2.     Choose one, two, or three stamps that remind you of Christmas and cover the background (over the words). Clean the stamps with a baby wipe when you are done.
3.     Use pretty papers and the “punch tools” to punch out shapes that remind you of Christmas. Glue the shapes onto the page.
4.     Add a layer of stamped images that tell the story of Christmas in your country.

5.     What do you want in your new country? What memories do you want to create for special Christmases? What are your hopes and dreams for Christmas 2015? Christmas 2016? (Why did you come here, and what do you dream for yourself and your children?)

Puzzles of Home

 Popsicle stick puzzles tell the story of "home." This fun project involves prepping eight Popsicle sticks: simply taping them together with masking tape. The the participants tell the story of home by drawing in the details of their house, trees, and yard. These images were created by women in an immigrant family detention center. The idea was for the moms to draw the images of their homes and then to use the art puzzles with their children to tell the story of home. Remove the tape the the sticks become a puzzle.
 The supplies list is very simple: Popsicle sticks, masking tape, and marker pens.

Puzzle Project Fosters Memories of Home


An artist friend (Lynn) developed a simple puzzle project as a teaching tool for children to learn about different human habitats. I adapted it as a project with immigrant women inside a family detention center as a way to talk about memories from home with their children.
The project requires eight Popsicle sticks taped together (use two pieces of masking tape on the backside). It's easier to have the sticks pre-taped. Lynn offers step-by-step guidelines on how to draw one's own home ("habitat"). The art technique emphasis is contrasting colors. Outline in dark and fill with light; or vice versa. 

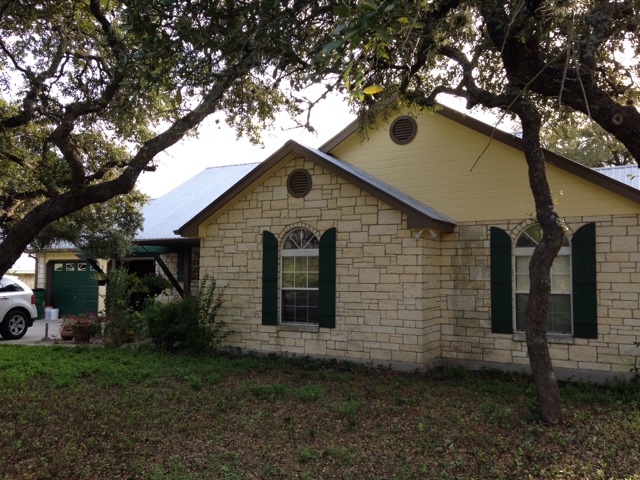
It is important to have a sample, not only for the "students" to have a visual but also so the instructor has had the experience in making the puzzle. It was helpful for me to have photos of my house to refer to as "guide prints."  Of course my immigrant participants would not have that luxury. 

1.          
Write your names on the back.
2.           Draw your “house” picture step by step, ONE step at a time.
3.           OUTLINE each step and color it in. Outlining is part of this process.
4.           Outline the house, door, windows and roof/chimney.
5.  Color in the forms made. Use colors that stand out next to each other
so you can “see” the outline –use a dark outline with light interior or vice versa.
6.  Outline the smoke and color it in.
7.  Draw a yard horizon line
8.  Draw the tree, foliage and branches Outline first then color in
9.  The flowers are next. Outline and color in with chosen colors.
10.        Draw the front “lawn” and color in or put flowers/rocks/pathways in. Color and outline
11.       
Draw any people, outline and color in.
12.        Outline mountains, or any background. DO NOT color in yet.
13.        Draw a sun next, outline and color in.
14.        Outline clouds and color in. Put mountains in, outline and then color the
 background after all images are outlined first. Add birds (“V” birds!)
15.       Add any details.

16.       Pull tape off and reassemble puzzles. Trade and do each other’s puzzles!

Risking Taking One More (Art) Step


It's always risky to take one more step with an art reflection that already "looks done." But sometimes there's just a sense that something is missing; that the story needs one more piece added to complete the telling. One of the reasons I take pix along the art reflection journey is so I have a photographic record to use as needed. An equally important reason is to show myself the evolution of the art/reflection journey. I can see where I stopped too soon or when, perhaps, I went one step too far. Of course the "right" stopping point is totally subjective! I think it's better to take the risk and do one more step rather then to do fear-based art and stop too soon. (Hmmmmm...perhaps there's a direct parallel here to living life risks and all or stopping short and playing it safe?!)

I thought I was done with this final/fourth step, but it looked a bit empty. I like to end with a strong/bold symbol or two that finishes the reflection with a flourish. I added a two-color heart stamp (I wish I'd chosen a darker shade of purple) and pinched butterflies. The two together signify mother-son, and the single butterfly the independence of the son flying free as he grows into who he is. 

Looking at these symbols I'm mindful of an embroidered wall hanging my sister gave me when our son was born: The two greatest gifts we give our children-one is roots and the other is wings.